Editing a scope box in Revit can streamline your project workflow. It helps manage views and layouts effectively.
Revit, a popular BIM software, offers powerful tools for architects and engineers. One such tool is the scope box. A scope box helps define specific areas of your project, making it easier to focus on details. But sometimes, you need to edit it to suit your evolving design needs.
Understanding how to adjust a scope box in Revit can save time and reduce errors. In this guide, we will explore simple steps to edit a scope box. This will enhance your efficiency and improve project management. Whether you’re new to Revit or looking to refine your skills, this guide will assist you. Let’s dive in and simplify the process together.

Credit: forums.autodesk.com
Introduction To Scope Boxes In Revit
Revit is a powerful tool in the world of architecture and construction. One of its useful features is the Scope Box. This feature helps control and manage complex projects. In this section, we will explore the basics of Scope Boxes in Revit. Understanding these basics is essential for effective project management.
Purpose Of Scope Boxes
Scope Boxes help define specific areas within a project. They allow you to control the visibility of these areas. You can organize and manage different parts of your project. This is especially useful for large and complex designs. By using Scope Boxes, you can focus on particular sections without distraction.
Benefits Of Using Scope Boxes
Using Scope Boxes brings several advantages. They help maintain clarity in your project. You can easily isolate and view specific areas. This makes it simpler to edit and manage your design. Scope Boxes also assist in creating consistent views. This is crucial for presenting your work to clients or team members.
Another benefit is improved coordination. Scope Boxes help keep everyone on the same page. They ensure that all team members focus on the same areas. This reduces confusion and increases productivity. They also make it easier to update and modify your project. Changes are more manageable and less overwhelming.
In summary, Scope Boxes are a valuable tool in Revit. They help define, manage, and coordinate complex projects. Understanding their purpose and benefits can enhance your workflow. This results in a more organized and efficient design process.
Setting Up Your Project
Editing a scope box in Revit can seem challenging. But with proper setup, the task becomes easier. This guide will help you through the steps.
Opening Your Revit Project
First, you need to open your Revit project. Here’s how:
- Launch Revit from your desktop or Start menu.
- Click on the File tab in the upper left corner.
- Select Open from the dropdown menu.
- Browse to your project file and double-click to open it.
Locating Scope Box Tools
Next, you need to locate the Scope Box tools. Follow these steps:
- Go to the View tab in the ribbon at the top of the screen.
- In the Create panel, find and click the Scope Box icon.
- The Scope Box tools will appear. You can now edit or create a new scope box.
If you are unsure where to find the View tab or Create panel, refer to the table below:
| Element | Location |
|---|---|
| View Tab | Ribbon at the top of the screen |
| Create Panel | Within the View Tab |
| Scope Box Icon | Create Panel in the View Tab |
Once you locate the tools, you can start editing your scope box. Make sure your project is set up correctly. This will help you avoid any issues later.
Creating A Scope Box
Creating a scope box in Revit can help you manage your views. It’s a useful tool for controlling the visibility of elements in your project. Below, we’ll walk you through the steps of drawing and adjusting a scope box.
Drawing The Scope Box
First, open your project in Revit. Go to the “View” tab on the ribbon. Click on “Scope Box” under the “Create” panel. Draw the scope box by clicking and dragging your cursor in the drawing area. The box you draw will define the area you want to control. Release the mouse button to finish drawing the scope box.
Adjusting Dimensions
After drawing the scope box, you can adjust its size. Select the scope box in your drawing area. Use the grip handles on the corners and sides to resize it. Click and drag the handles to adjust the dimensions. Make sure the scope box covers the area you need. You can also enter exact dimensions in the properties palette. This allows for precise control over the scope box size.
Editing Scope Box Properties
Editing the properties of a scope box in Revit helps you control its visibility and dimensions. This is essential for managing large projects and ensuring that specific areas are correctly displayed. Let’s dive into how you can edit these properties effectively.
Changing Dimensions
To change the dimensions of a scope box, follow these steps:
- Select the scope box in your Revit project.
- In the Properties palette, locate the Extents section.
- Adjust the Length, Width, and Height values as needed.
Changing the dimensions helps in focusing on specific parts of your project. Ensure that the values you enter fit the area you want to cover. This step is crucial for detailed work and presentations.
Renaming The Scope Box
Renaming a scope box makes it easier to identify among multiple scope boxes. Follow these steps to rename it:
- Click to select the scope box.
- Go to the Properties palette.
- In the Name field, enter a new, descriptive name.
A good name helps in quickly identifying the scope box for future edits. Use names that describe the area or purpose, such as Living Room or North Wing. This practice ensures better project management and reduces confusion.
Adjusting Visibility Settings
Editing a scope box in Revit requires adjusting its visibility settings. This involves determining which views the scope box will appear in and how it affects the overall project. Ensuring the scope box is visible in the right views enhances clarity and organization.
Visibility In Views
To adjust visibility, start by selecting the scope box. Then, navigate to the properties palette. Here, you will find the “Visible in View” option. This allows you to choose which views will display the scope box. It is crucial for maintaining a clean and organized workspace.
Visibility settings help you manage complex projects. By controlling where the scope box appears, you can focus on specific areas without distraction. This ensures that your design process is efficient and streamlined.
Applying To Multiple Views
Applying visibility settings to multiple views can save time. Instead of adjusting each view individually, use the “Apply to Views” function. This is found in the properties palette. Select the views you want to apply the scope box to, and confirm your selection.
This method ensures consistency across your project. It guarantees that all relevant views maintain the same visibility settings. This reduces errors and enhances project management.
Using Scope Boxes For Annotation
Scope Boxes in Revit are powerful tools. They help control the visibility of annotations and model elements. Understanding how to use Scope Boxes for annotation can improve your project documentation. It can make your drawings cleaner and more organized.
Aligning Annotations
Aligning annotations within a Scope Box ensures clarity. It keeps all notes, dimensions, and other annotations in a specific area. This makes it easier to read and understand the drawing. Follow these simple steps to align your annotations:
- Select the Scope Box.
- Choose the annotations you want to align.
- Use the alignment tools to position them within the Scope Box.
These steps help maintain a tidy and professional layout. Annotations that are aligned are easier for everyone to read.
Controlling Annotation Visibility
Controlling the visibility of annotations is crucial. It ensures that only the necessary information is displayed. This is particularly useful in complex drawings. Here’s how to control annotation visibility using Scope Boxes:
- Select the Scope Box you want to edit.
- Go to the Properties palette.
- Under the Visibility/Graphics Overrides, adjust the settings.
- Check or uncheck the categories you want to show or hide.
These steps help keep your drawings clean and focused. They allow you to display only the relevant information. This can make your work more efficient and effective.
Best Practices For Scope Box Management
Managing scope boxes in Revit can enhance project accuracy and coordination. Following some best practices can save time and avoid common issues. The sections below will guide you on how to efficiently manage scope boxes.
Organizing Scope Boxes
Organizing scope boxes is essential for a well-structured Revit model. Here are some tips:
- Name scope boxes clearly: Use descriptive names that indicate their purpose or location. This avoids confusion.
- Group related scope boxes: Keep scope boxes for similar elements together. This helps in managing them easily.
- Use different colors: Assign different colors to scope boxes. This makes them visually distinct.
Here’s a simple table to illustrate a scope box organization example:
| Scope Box Name | Purpose | Color |
|---|---|---|
| Ground Floor | Define ground floor elements | Blue |
| First Floor | Define first floor elements | Green |
| Elevations | Define elevation views | Red |
Avoiding Common Mistakes
Avoiding mistakes with scope boxes can save time and reduce errors. Here are some common pitfalls:
- Overlapping scope boxes: Ensure scope boxes do not overlap. Overlapping can cause view issues.
- Incorrect scope box size: Verify that scope boxes are appropriately sized. Too large or too small can affect view clarity.
- Unassigned scope boxes: Always assign scope boxes to specific views. Unassigned boxes can lead to confusion.
By following these best practices, you can ensure efficient scope box management in Revit.
Credit: help.autodesk.com
Troubleshooting Common Issues
Editing a scope box in Revit can sometimes be tricky. You might face common issues that slow down your work. This section will help you troubleshoot these problems with ease.
Scope Box Not Visible
Sometimes, the scope box might not appear on your screen. Check the visibility settings first. Make sure the scope box is set to visible in the view. Also, ensure the scope box is not hidden in the view settings. If it is hidden, unhide it by selecting the view tab and choosing ‘Reveal Hidden Elements’.
Another reason could be the scope box is outside the view range. Adjust the view range settings to include the area of the scope box. This should make it visible.
Incorrect Dimensions
Incorrect dimensions can distort your project. Ensure the scope box dimensions match your project needs. Select the scope box and check its properties. Make sure the length, width, and height are correct. If not, adjust them accordingly.
Also, verify the scope box is aligned properly. Misalignment can cause dimension issues. Use the align tool to correct any misalignment. This ensures the scope box fits perfectly within your project parameters.
Conclusion And Final Tips
Editing a scope box in Revit requires precision. Use the modify tools to adjust size and position. Always double-check your changes for accuracy.
Editing a scope box in Revit can seem complex at first. With practice, it becomes second nature. This section will summarize the key points and offer additional tips.Recap Of Key Points
Editing a scope box involves a few main steps. First, select the scope box. Then, adjust its size and position. Remember to use the grips for resizing. Use the properties palette for precise adjustments. Always check the view range to ensure visibility.Additional Resources
For further learning, consider these resources. The Autodesk Knowledge Network has in-depth guides. YouTube also has many helpful tutorials. Online forums can provide community support. Practice regularly to improve your skills. “`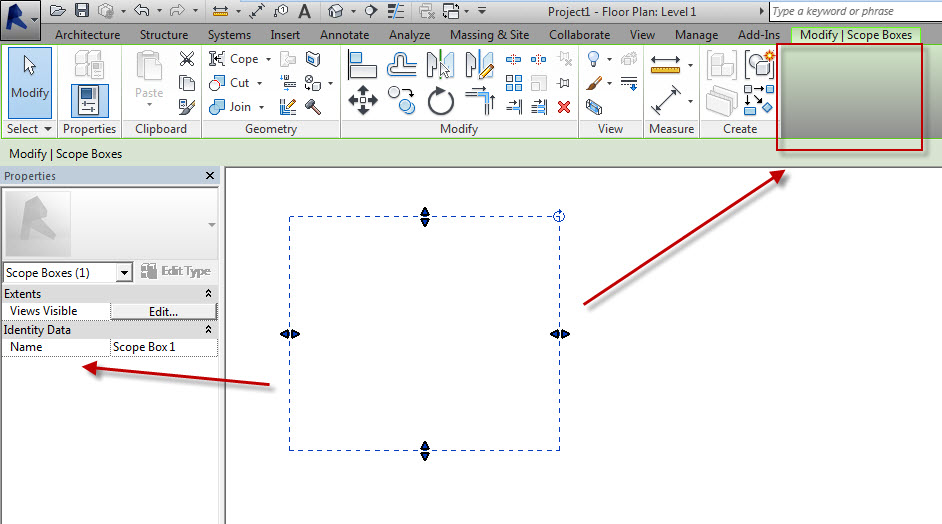
Credit: forums.autodesk.com
Frequently Asked Questions
How Do You Edit A Scope Box In Revit?
Select the scope box. Use the properties panel to adjust dimensions and position.
Why Can’t I See My Scope Box In Revit?
Check if the scope box is hidden. Use visibility settings to make it visible.
Can You Resize A Scope Box In Revit?
Yes, select the scope box. Drag the grips to resize it as needed.
What Is The Purpose Of A Scope Box In Revit?
A scope box helps control the visibility and extents of views in your project.
How To Rotate A Scope Box In Revit?
Select the scope box. Use the rotate tool to change its orientation.
Conclusion
Editing a scope box in Revit is a simple process. Follow the steps carefully. You can define the view range and details. Practice makes perfect. With these tips, you can manage your project views efficiently. Keep exploring Revit for more features.
Happy designing!